I saw this adorable QR code project on Twitter and decided to try it out with a couple of third grade classes. We have several schools in our district who are
"Leader in Me" schools and I asked a teacher if I could come in and make them for her open house (you don't need to be a "Leader in Me" school but I know they do a lot of goal setting and mission statements). She loved the idea!
I decided to use Flip (formally Flipgrid) to do the recording. The web based program is free for educators and automatically generates the needed QR code.
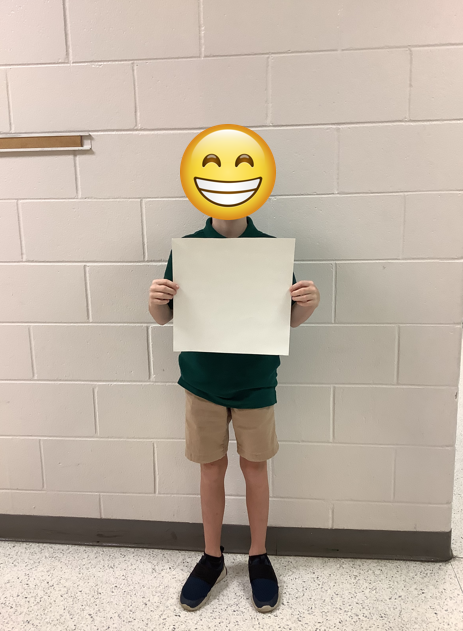
We started on a Thursday. I pulled students into the hall to get a picture of them holding a square piece of paper prior to an ELA block. The paper acted as a place holder for the QR code (which is square) and ensured I got the correct hand spacing so the students looked like they were holding the QR code. I found a spot that didn't have anything in the background. The background was going to be removed and the program I use (remove.bg) works best if the background is fairly neutral. This part went fairly fast.
The teacher gave me her ELA block (90 minutes) to teach students how to use Flip to record, delete, use their graphics, find my instructions, etc. They joined my Flip easily with a code that is generated once I made a topic for them to post to. Their independent project was a simple "About Me" video they had to create and submit.
The directions can be pulled up while they are recording so they could track what they were required to do without having to leave the program.
The students did a great job and we talked about being expressive with your hands and voice while recording and the kids did a great job of hamming it up.
I came back the next day (Friday) and used her math block to have students record the actual project which was of their mission statement for the year. I broke up their recording into seven clips so they could stay a bit focused. Here were their instructions:
Students were finished at all different times so she had a some math work ready for those who were done. They weren't allowed to publish their video until it been checked by one of us.
Check out
one of the recordings HERE (it is pretty darn cute!).
I came back Monday and caught some stragglers who weren't there Friday and started working on the cutouts.
I took the hallway images and ran them through
remove.bg. The site is free to use and I removed the background of approximately 50 images (two classes of students).
I used Google Slides to stage all the student pictures. I changed the dimensions of the slides to 8.5 x 11 for printing purposes (under "file" and "page setup"). I inserted a 2x2 table on each page to help monitor the spacing of student pictures (deleting the table as soon as I was done each page).
I went into Flip and went down the list of student videos. I clicked on the share icon next to each student (1) and opened the QR code (2) and used my computer's snipping tool (3) to copy and paste the QR code onto the paper in the students hands (adjusting as needed). It worked best to get the student picture on the slide and then add their QR code before moving onto the next student.
I then printed all the pages on card stock and cut around the students (a bit like paper dolls) and added the MEDIUM sized binder clips at the feet to hold them up. They were $4.79 for 15 at Staples (Walmart sold a mixed bag of sizes and I wanted the mediums so I had to go to Staples).
I made some signs to go with them and printed them on some colored paper (not card stock). I used a 3x3 table in Google Slides and inserted a rectangular shape with no fill and a black line boarder width of 4 points.
This pretty much took up all of my day getting the two classes done. I have a couple of stragglers I am going to try and catch tomorrow but the open house is Tuesday night so the project ends there.
It was a great way to introduce Flip to students and showcase some technology use at an open house. I definitely will be doing it again!
If you try this out, please let me know in the comments, or by tagging me on Twitter
@atechcoachlife.


Comments